Environment
- OS: Linux (RHEL/Amazon Linux 2023)
- ACME Client: Certbot
- Certificate Authority: Let’s Encrypt
- DNS Provider: AWS Route 53 (or Cloudflare)
- Web Server: Nginx (running in Docker)
Introduction
SSL certificates expire every 90 days when using Let’s Encrypt. Doing this manually every time is tedious and error-prone — especially when intermediate certificates have to be copy-pasted by hand into a text editor. I set out to fully automate this process using Certbot and the ACME protocol, eliminating all on-site manual work.
1. The Old Manual Renewal Flow
Before automation, renewing a certificate involved steps like:
- Obtaining the new SSL certificate file from the CA.
- Placing it on the server manually.
- If an intermediate certificate existed, opening
server.crt in a text editor (nano server.crt) and manually appending the intermediate certificate content to the end of the SSL certificate file. - Restarting the web server container.
This was time-consuming, inconsistent, and impossible to schedule — a perfect candidate for automation.
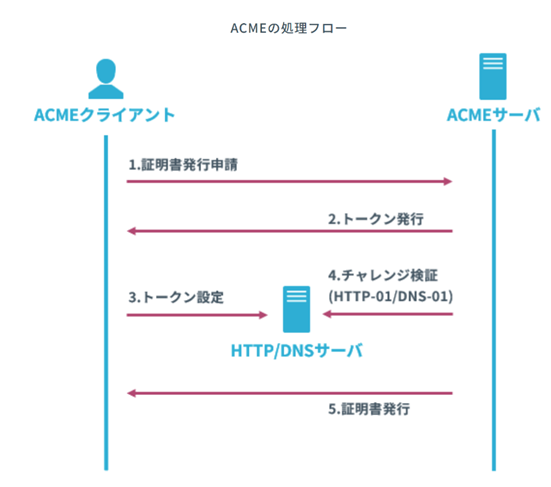
2. How ACME Automation Works (DNS-01 Challenge)
By integrating an ACME client (Certbot) with an external DNS provider’s API, all on-site manual steps can be eliminated.
DNS-01 vs HTTP-01
| DNS-01 | HTTP-01 |
|---|
| Requires open inbound port | No | Yes (TCP 80) |
| Service interruption | None | Temporary container stop needed |
| Wildcard certificate support | Yes | No |
| Drawback | Needs DNS provider API token | Port 80 may need customer approval |
DNS-01 is strongly preferred for production systems that cannot afford downtime or do not have port 80 open.
DNS-01 Challenge Flow
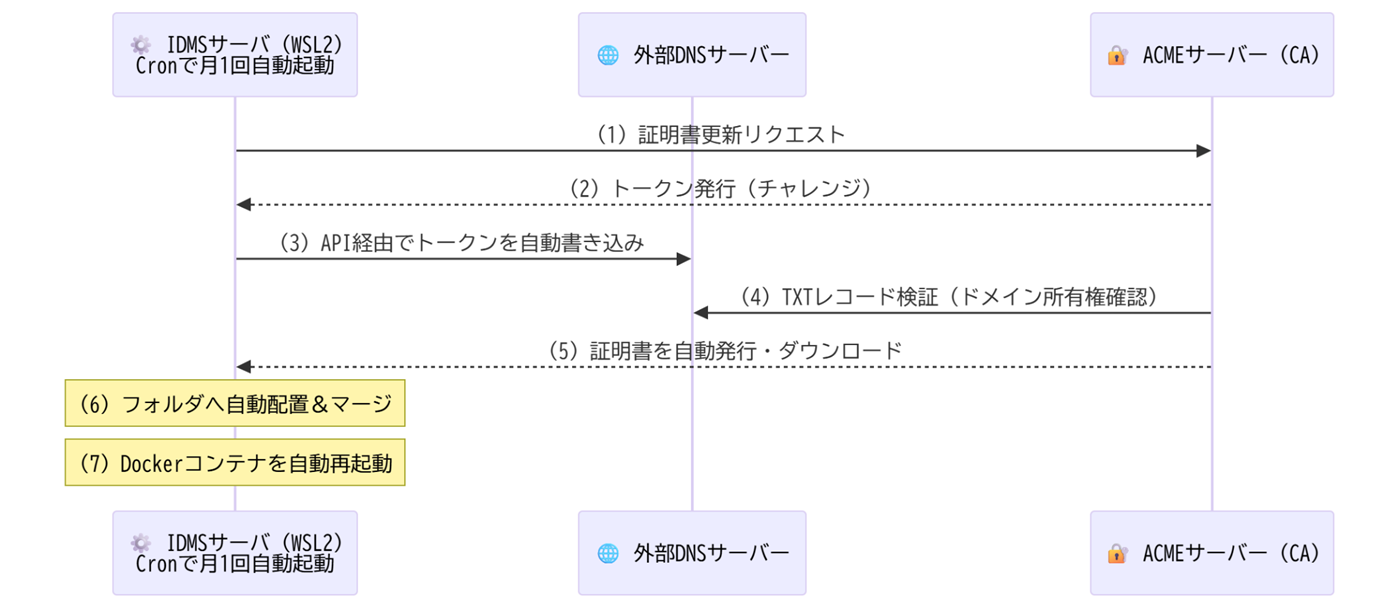
Automated DNS-01 Flow
 1
 2
 3
 4
 5
 6
 7
 8
 9
10
11
12
13
14
15
16
| (1)+(2) Linux Cron → Certbot starts once a month automatically
↓
Certbot requests a random token from the ACME server (Let's Encrypt)
↓
(3) Certbot calls the DNS provider API (AWS Route 53 / Cloudflare)
and writes the token as a TXT record: _acme-challenge.yourdomain.com
↓
(4) ACME server looks up the TXT record from the public internet
and verifies domain ownership automatically
↓
(5) New certificate is issued — SSL cert + intermediate cert are
already merged into fullchain.pem (no manual text editing needed).
Private key is generated without a passphrase.
↓
(6)+(7) Script copies files into place and restarts the Nginx Docker container.
Certbot also automatically removes the temporary TXT record.
|
3. Nginx SSL Configuration
The web server reads the certificate from a fixed path. This is configured in proxy_ssl.conf:
1
2
3
| ssl_certificate /usr/local/app/ssl/server.crt;
ssl_certificate_key /usr/local/app/ssl/server.key;
ssl_password_file /usr/local/app/ssl/server.key.passphrase;
|
Note: When Nginx starts, it reads the passphrase file. Since Let’s Encrypt generates a passphrase-less private key, we write an empty passphrase file to safely bypass this setting without changing the Nginx configuration.
4. The Automation Script
Save the following as /opt/scripts/renew_cert.sh:
 1
 2
 3
 4
 5
 6
 7
 8
 9
10
11
12
13
14
15
16
17
18
19
20
21
22
23
24
25
26
27
28
29
30
31
32
33
34
35
36
37
38
39
40
41
42
43
44
45
46
47
48
49
50
51
52
53
54
55
56
57
58
59
60
61
62
63
64
65
66
67
68
69
70
71
72
73
| #!/bin/bash
# Explicitly set PATH (required for Cron execution)
PATH=/usr/local/bin:/usr/bin:/bin:$PATH
# =====================================================
# Configuration section (adjust for your environment)
# =====================================================
DOMAIN="yourdomain.com"
# CREDENTIALS_PATH is not needed when using IAM Role for authentication
TARGET_SSL_DIR="/usr/local/app/ssl"
CONTAINER_NAME="your-web-container"
echo "================================================="
echo "$(date '+%Y-%m-%d %H:%M:%S') : Starting SSL certificate auto-renewal."
echo "================================================="
# =====================================================
# Step 1: Issue / renew certificate via Certbot (DNS-01)
# =====================================================
echo "[INFO] Running ACME client (Certbot)..."
certbot certonly \
--dns-route53 \
-d "$DOMAIN" \
--non-interactive \
--keep-until-expiring \
--agree-tos \
--email your@email.com
# Check the exit status of the previous Certbot command
# 0 = success (renewed, or skipped because still valid)
# !0 = error
if [ $? -eq 0 ]; then
echo "[SUCCESS] Certbot finished successfully. Applying the certificate."
# =====================================================
# Step 2: Copy new certificate files into place for Nginx
# =====================================================
echo "[INFO] Copying and renaming certificate files..."
# Copy both the full-chain cert and the private key to match proxy_ssl.conf paths
cp "/etc/letsencrypt/live/$DOMAIN/fullchain.pem" "$TARGET_SSL_DIR/server.crt"
cp "/etc/letsencrypt/live/$DOMAIN/privkey.pem" "$TARGET_SSL_DIR/server.key"
# Restrict private key permissions to owner (root) only — Linux best practice
chmod 600 "$TARGET_SSL_DIR/server.key"
# Write an empty passphrase file (0 bytes) to safely bypass the existing passphrase setting
echo -n "" > "$TARGET_SSL_DIR/server.key.passphrase"
# =====================================================
# Step 3: Restart the web server container to apply changes
# =====================================================
echo "[INFO] Restarting the web server container to load the new certificate..."
docker restart "$CONTAINER_NAME"
if [ $? -eq 0 ]; then
echo "================================================="
echo "[SUCCESS] SSL certificate auto-renewal and deployment complete!"
echo "================================================="
else
echo "[ERROR] Failed to restart the Docker container. Please check the web server status."
exit 1
fi
else
# Certbot failed (network error, auth failure, etc.)
echo "================================================="
echo "[ERROR] Certbot certificate renewal failed."
echo "[WARN] Skipping file copy and container restart to protect the existing valid certificate."
echo "[WARN] The web service continues with the current certificate — please check the logs."
echo "================================================="
exit 1
fi
|
The /etc/letsencrypt/live/$DOMAIN/ directory is created automatically by Certbot after the first successful certificate issuance.
5. Installation
 1
 2
 3
 4
 5
 6
 7
 8
 9
10
11
12
13
14
15
16
17
18
| # Install pip3
sudo dnf install -y python3-pip
# Confirm
pip3 --version
# Install Certbot and the Route 53 DNS plugin
pip3 install certbot certbot-dns-route53
# Create the scripts directory
mkdir -p /opt/scripts
# Create the SSL target directory if it doesn't exist
mkdir -p /usr/local/app/ssl
# Place the script and make it executable
# (copy renew_cert.sh to /opt/scripts/ first)
chmod +x /opt/scripts/renew_cert.sh
|
Dry-run test (no certificate is actually issued)
1
2
3
4
5
| certbot certonly --dns-route53 --dry-run \
-d yourdomain.com \
--non-interactive \
--agree-tos \
--email your@email.com
|
Run once manually to verify
1
| sudo /opt/scripts/renew_cert.sh
|
6. Cron Job Setup
1
2
3
4
5
| # Open the crontab editor
sudo crontab -e
# Run at 3:00 AM on the 1st of every month
00 03 01 * * /opt/scripts/renew_cert.sh >> /var/log/cert_renew.log 2>&1
|
1
2
3
4
5
6
7
8
| # Start the cron daemon
sudo systemctl start crond
# Enable it to start automatically after reboot
sudo systemctl enable crond
# Check status
sudo systemctl status crond
|
7. Verification Commands
1
2
3
4
5
6
7
8
| # Check that certificate files are in place
ls -la /usr/local/app/ssl/
# View certificate details and expiry
certbot certificates
# Confirm the web server container is running
docker ps | grep your-web-container
|
8. When You Can’t Use a DNS Provider API Directly
In some cases, obtaining a long-lived API token from the production DNS provider is not possible due to security policy constraints or because the DNS service has no API.
Solution: CNAME Delegation to AWS Route 53
Instead of directly writing to the production DNS zone, you delegate only the ACME ownership-verification process to an AWS Route 53 hosted zone that you fully control.
Step 1 — Add one CNAME record to production DNS (one-time manual operation)
| Field | Value |
|---|
| Host | _acme-challenge.yourdomain.com |
| Type | CNAME |
| Value | yourdomain.ssl-verify.example.com (your Route 53 delegation zone) |
Step 2 — Set up the AWS Route 53 delegation zone
- Create a new hosted zone in Route 53 (e.g.,
ssl-verify.example.com). - Using IAM, create a dedicated account with permissions strictly limited to adding/deleting TXT records within only this hosted zone. Generate an Access Key ID and Secret Access Key for it.
- Place the credentials in
/root/.aws/credentials:
1
2
3
| [default]
aws_access_key_id = YOUR_ACCESS_KEY
aws_secret_access_key = YOUR_SECRET_KEY
|
Step 3 — Update the Certbot command in the script
1
2
3
4
| certbot certonly --dns-route53 \
-d "yourdomain.com" \
--non-interactive \
--keep-until-expiring
|
Certbot automatically writes the verification TXT record into the Route 53 zone (via the CNAME pointer) and removes it after validation — all without touching the production DNS directly.
Additional Thoughts
The shift from manual certificate management to ACME automation removed an entire class of human error from our operations. The DNS-01 challenge in particular is elegant: it requires zero changes to firewall rules, causes no service downtime, and the CNAME delegation pattern makes it work even in tightly controlled DNS environments. Once the Cron job is in place, certificates simply renew themselves — indefinitely.